Gled GUI
Partially revised for Gled version 1.5, June 2005. Expect new
version with better tutorial section soon.
The graphical user interface is one of the central components of the
Gled system. For every public member variable or method, a GUI
component can be requested in the source. These components are FLTK
widgets that can be composed in different ways. Gled provides one
such mode, called the Monitor - it is the standar GUI that the user
gets when Gled is started with its interactive GUI component, the
Eye, enabled. The monitor presents (1) FullView windows, where all the
component widgets of a given lens (object instance) are presented,
ordered by the C++ class inheritence, (2) Nests windows, where the
object graphs (inter-object relationships composed of various
containers and links, ie. pointers to other ZGlass-descendent
objects) are presented, method-browser menus with method invocation
request dialogues, and the 3D rendering window, called the Pupil.
The Eye is the viewer that completes the server-proxy-client into the
complete Gled runtime system.
But the Monitor is just the default way of using the component
widgets; it is optimized for development and prototyping. The Eye is
capable of using structures in the object-collection as instructions
for component-widget layaout - this is called the MetaGUI and is
implemented directly in the core Gled system. MetaGUI allows for
almost arbitrary composition of components so that thy can be used as
customizations to facilitate the use of the Monitor GUI, or to compose
an application GUI for the end user.
All this can be achieved using scripts, datafiles or user interaction,
with component widgets, that have been auto-generated based on
programmers requests in the source - without any need for direct
coding of the widgets and GUI. Of course, the interfaces can be
extended further via subclassing of the Eye, but this should be rarely
needed.
Gled can be used also without any GUI component at all since
Gled provides two executables. The saturn executable is compiled
with no GUI support and is intended for non-interactive jobs, worker
nodes, remote server nodes in the cluster hierarchy etc. It optionaly
provides interactive command-line CINT interface but is otherwise
restricted to network access.
The other Gled executable is called gled - this is the default
executable, compiled with full GUI support. When starting, by default
it opens a graphical message & control window for the
server-proxy-client (ie. saturn) alongside th interactive command-line
CINT shell that is opened the terminal. The message and control
window is not yet part of the Eye, the GUI compontent itself.
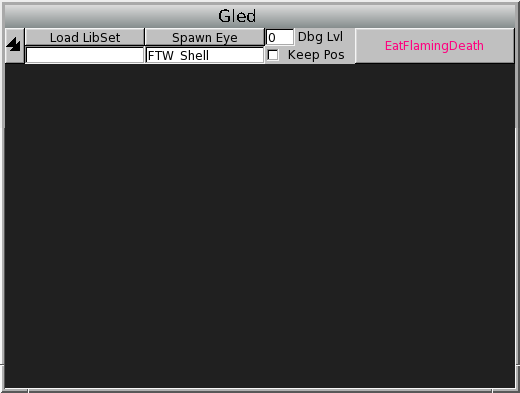
Saturn control window and Eye
A simple saturn instance with graphical message & control window will
be started simply by invoking gled with no command-line options, like this:
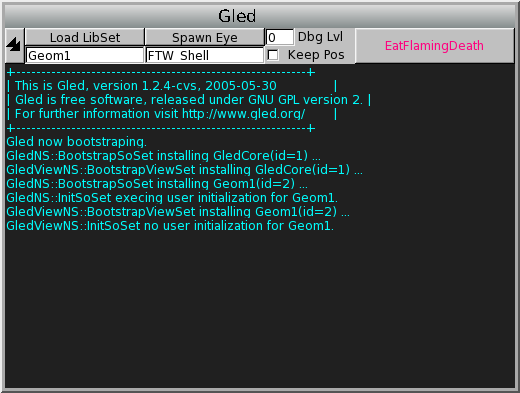
	$ gled
	Staring ROOT command-line interpreter ...
	  *******************************************
	  *                                         *
	  *        W E L C O M E  to  R O O T       *
	  *                                         *
	  *   Version   4.03/04      8 April 2005   *
	  *                                         *
	  *  You are welcome to visit our Web site  *
	  *          http://root.cern.ch            *
	  *                                         *
	  *******************************************

	FreeType Engine v2.1.3 used to render TrueType fonts.
	Compiled for linux with thread support.

	CINT/ROOT C/C++ Interpreter version 5.15.169, Mar 14 2005
	Type ? for help. Commands must be C++ statements.
	Enclose multiple statements between { }.
	Use context menu in Nest to import lenses as CINT variables.
	gled[0]
Since Gled is a ROOT application, you get to see ROOT's
welcome message, then the CINT interpreter starts at the terminal
and welcomes you with a gled prompt. Then, the saturn control
window opens.
The saturn control window has two important widgets: one for loading
new libsets, and the other for spawning new Eyes (GUI
components). (The strangley named button simply terminates the
application.) There is also the debbugging setting and a check button
for windowmanager layout control.
Loading new libsets is easy, if you know what is available. Simply
enter the correct libset name in the text-input widget and click on
the Load LibSet button. For example, try loading the basic geometry
library, Geom1.
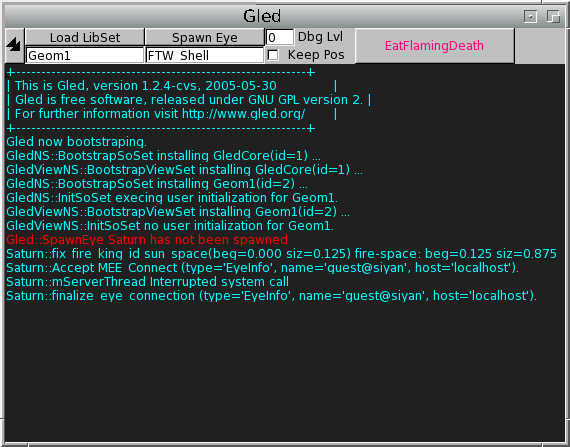
Starting an Eye is sligthly more tricky, since it needs the saturn's
server (ie. Sun) to be running before it can start. If you try to
start it before, you will get an error saying: Gled::SpawnEye
Saturn has not been spawned. Usually demo files and applications do
all the Sun and Eye startup for you, but you can also do it by
hand. If you followed the previous example, all you have to do now is
invoke the following command in the CINT:
gled[0] Gled::theOne->SpawnSun();
Now you can press the SpawnEye button and a new window will appear.
If you want to spawn the Sun and an Eye directly from the command line
or a startup script, you can use the two scripts sun.C and eye.C
which spawn a Sun and an Eye respectively, and provide some handy
settings. You can call the two scripts directly on the command line
simply by mentioning their name (they should be always available since
they are stored in Gled's global macro director):
	$ gled sun.C eye.C
	Staring ROOT command-line interpreter ...
	  *******************************************
	  *                                         *
	  *        W E L C O M E  to  R O O T       *
	  *                                         *
	  *   Version   4.03/04      8 April 2005   *
	  *                                         *
	  *  You are welcome to visit our Web site  *
	  *          http://root.cern.ch            *
	  *                                         *
	  *******************************************

	FreeType Engine v2.1.3 used to render TrueType fonts.
	Compiled for linux with thread support.

	CINT/ROOT C/C++ Interpreter version 5.15.169, Mar 14 2005
	Type ? for help. Commands must be C++ statements.
	Enclose multiple statements between { }.
	Use context menu in Nest to import lenses as CINT variables.
	gled[0]
	Processing sun.C...
	Processing eye.C...
	gled[2]
This should start the server, open the Eye's GUI windows and also
spawn a Pupil (a 3D rendering window). Not much will be seen, of
course, since there are no renderable objects loaded.
The underlying architecture of the GUI is fully decoupled from the
client-server, permitting more than one Eye per Saturn. This means
that you can spawn a new Eye even when one is already running.
For more details on Eye class and the ways to custmize it via
sublassing, see gledparadigms and gledarch for details.)
Anatomy of the Eye
The Eye runs in the Gled application as an independent thread. It
has direct read-access to the object collection, but can only interact
with it through the method invocation request (MIR) interface - it
behaves very much as if requests are coming from another saturn in the
server-proxy-client cluster hierarchy. It also recieves update
requests called rays. This allows the Eye to perform updates when
data is changed, thus making it a completely interactive viewer
interface.
The Eye opens its own top-level window, called the Shell. The
Shell contains the main status bar and message console of the Eye,
and by default it embeds an object browser - called a Nest. The
Shell allows any number of additional Nests (object browsers) to be
used and can spawn any number of interactive GL rendering windows called
Pupils. Both Nests and Pupils are descendants of class SubShell
and are managed by the Shell.
The Shell controls many properties of the other GUI elements, most
notably FullView presentation and Nest locator use. For details
for FullViews, see Full views. For details for Nests, see
Shell and Nests.
The Pupil provides 3D camera navigation and rendering control, but
it also allows for direct object interacion and render-graph browsing
with the Pupil Contex Menu, accessible via mouse right-click on an
object in the viewport.
By double-clicking an object label in the Nest window or its rendering
in the Pupil (interactive GL render view window) a FullView of the
lens (the instance of a gled object or Glass) can be opened. Lens
FullViews are automatically built from autogenerated widget components
for GUI-exported object member variables and methods of the lens. This
allows fast object inspection and editing, and the individual widgets
for member variables and methods can be used in different contexts, as
explained later (Nest basics.
Some widgets spawn their own utility windows (dialogs, color-pickers
etc.).
Any widgets that represent a lens in some way have a Lens Context Menu
(accessible via right-mouse click). The context menu has options to
open a FullView of the lens, to open the Lens in a Nest browser and
submenus for access to object methods of the lens and its
autogenerated accessor methods. This makes the Lens Context Menu a
very poverful access point for the user.
Drag-and-drop is the easiest way of setting links and manipulating
lists. Wherever a labelled button is used to represent a lens, it can
be dragged to a link or a list to set the link or add the lens to the
list. Rosy titlebars of FullView, Nest and Shell widgets can
also be used as draggable source. For targets, besides links and
lists, lenses can be dragged on another lens to add it after the lens
in a list, on a list to add it into it, and on a method call button
where the lens becomes the beta argument of the method call.
Paste (middle mouse button) is also supported - it alway perfroms
an insert (acutally, push) command with the Shell's source. Thus it
can be used with locators or with the creator: it is probably the
easiest way to place several new lenses.
It should be noted that Gled, even in GUI-mode, still runs the
CINT interactive C/C++ interpreter in the terminal where it was
started from. The use of the CINT interactive session with GUI is
facilitated with the ability to export any lens via its Lens Context
Menu. Additionally, a drag-and-drop action from an object label to any
text-terminal (including CINT) will paste the lens ID. (More info:
Using the lens and link labels). Note also that CINT implements
GNU-Readline-like command line editing and completion, including
completion on C++ object methods and members. (See ROOT
documentation for reference, http://root.cern.ch/root/Cint.html.)
The best way to learn using Gled GUI is to start using it. For this
purpose, we will provide a set of examples, recipies and tutorials in
the rest of this document.
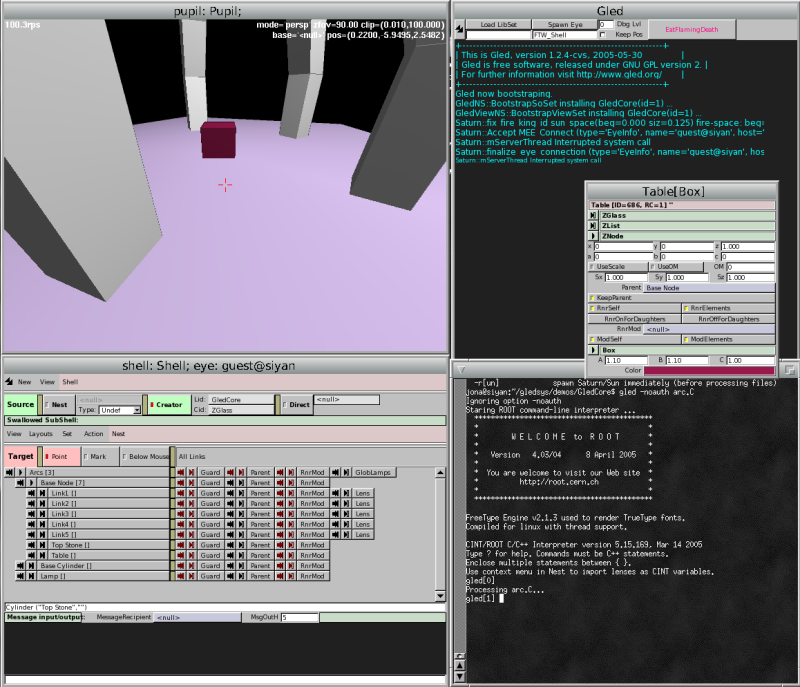
First, we have to start Gled and load a simple demo scene. Find
your Gled installation directory, change directory to the
GledCore demos and load arc.C, preferably with authentication
disabled (so that we don't have to learn about premissions just yet):
	cd $GLEDSYS
	cd demos/GledCore
	gled --help # if you want to see all the options
	gled -noauth arc.C
The result should look very much like the following screenshot. Try
double-clicking on the red box in the Pupil to get the FullView
of the object, just like in the screenshot. (You can hide it by
pressing ESC in the window or you can use the window manager to
close it.)
This should be practical for the following section on full view GUI.
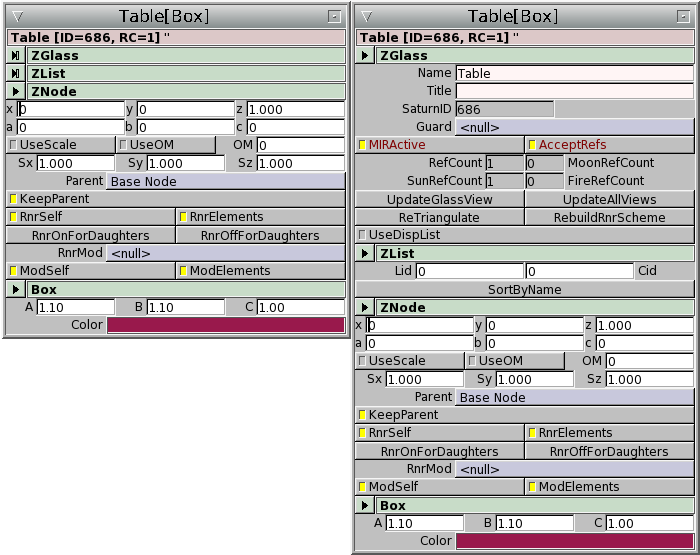
Full views
Full view is composed of all widgets for a given lens, organised in a
vertical structure which follows the class hierarchy of the lens. By
default, every class is separated by its own header. The header have
collapsors, so that you can hide classes that you do not need. By
default, ZGlass and ZList, the two most commonly used base
classes, are collapsed to conserve your desktop space.
The specifics of how the full views are handled are defined by the
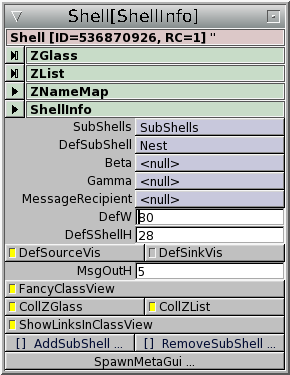
relevant settings in the ShellInfo.
To access the ShellInfo of the current Shell, you can double-click
the pinkish area of the Shell control or use the right-click contex
menu comman Open Full View.
You should do so now to try out the options for full views. Change an
option and open a new full view by double-clicking on a lens label or
a rendered object. Notice how even if you hide a full view with
ESC, it does not change when you change the options, but any new
full views will come up with the new options. This is because the
windows are not destroyed, only hidden. If you want to discard all
full views and recreate them with new settings, you should use the
command Remove transients in the Nest's View menu.
It is best to leave the links (violet) alone for now - they are
explained in the section Shell and Nests.
Overview of main classes
ZGlass full view
Since all lenses are ZGlass descendants, all full views start with the
standard ZGlass member-variable widgets Name and Title. These
are read-write widgets so you can easily edit names and titles of
lenses. (They are also available in the nest's predefined custom view
under Nest->View>Predef Custom->ZGlass.)
The SaturnID is a read-only value, representing the ID of the
current lens in the object ID space (good for debugging, etc.)
Each ZGlass has a read-only boolean indicator MIRActive which shows
whether the lens is currently accepting MIRs.
ZList full view
Many glasses inherit from ZList but ZList itself has no visible
widgets int the full view. You can access the list members using
nest's list view. In the future, ZLists may be limited to allow
only a defined glass of list members and this setting will be
presented as a widget in the full view.
ZNode full view
ZNode contains relative positional offset represented with the
Pos widget which contains three sub-widgets, x, y and z
and relative rotational offset represented with the Rot widget
which contains three sub-widgets, a, b and c. (These widgets
are also available in the nest's predefined custom view under Nest->View>Predef Custom->ZNode.)
ZNest implements an object tree using links and lists. A a <ZList>
descendant it stores its children as list members and its parent as
the value of the Parent link. It's full view contains the
KeepParent boolean toggle which controls whether the ZNode
should keep its previous parent when it becomes member of a new list,
or the parent should be changed to the new list.
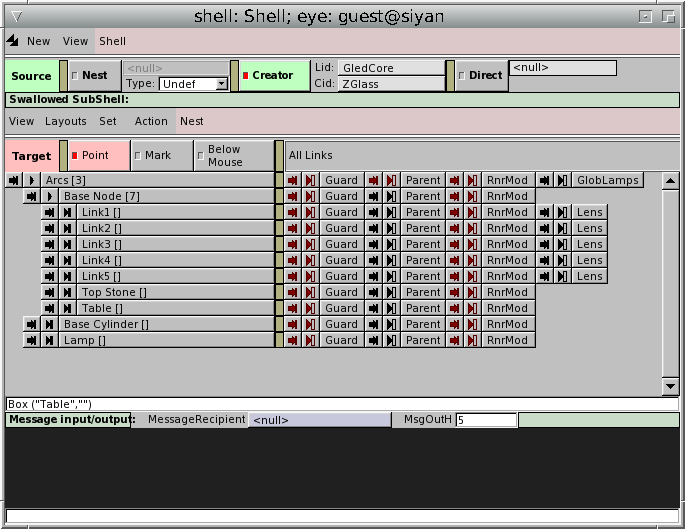
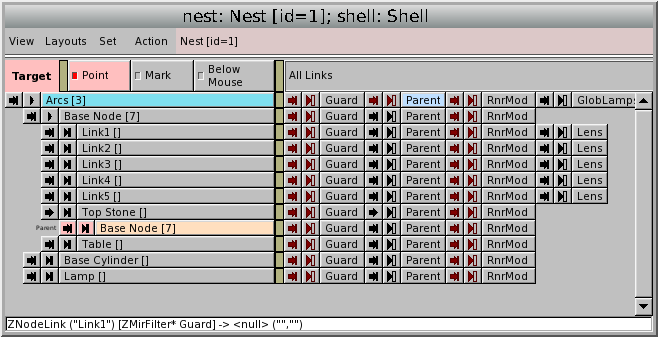
Shell and Nests
The Shell is the top-level interaction window. It contains the shell
part, where shell's global settings for source and sink
(Object collection editing with Nest) of the current Eye are
located (sink is hidden by default); under the shell part of the Shell
window, a swallowed Nest is located. The Nest contains target settings
(local to each Nest) and Nest menus. Note that any number of bare Nest
windows and new Pupil windows can be spawned using the nest New->New Nest and New->New Pupil menu option in the Shell.
The main part of the Shell window is a swallowed widget, by default a
Nest (object graph browsing widget), further explained bellow.
The bottom part is a Message input/outuptg console for the Eye. This
is errors and "access denied" messages for GUI commands are
displayed. In fact, any message for the Eye object will appear
here. You can address any message to any object simply by inputing the
message in the lower, white part of console. Prefix the message with
the name of the object a colon. Using the name of another Eye sends
the message directly to that Eye's console - this can be used for
simple message exchange with other Gled users.
[This is not really true int his version anymore]
Nest basics
The main widget of Nest is the object graph browser. The left part
shows a tree-like view of the object collection, where every lens is
represented with labelled button with its Name and, if it is a
ZList or descendant, the number of list-memeber in braces. On the
right side, either the links for each lens can be shown (default;
these are called Ants) or a custom selection of object-view widgets
for the lenses. This can be toggled with View->Links/Custom
menu action (or ctrl-v, all keyboard shortcuts are shown next
to the menu labels). The custom view can be edited with the View->Edit Custom command (Editing and setting custom lens views).
Some useful predefined custom views are available in the Layouts
menu. These are usually ordered in submenus according to their libsets
and are provided by the libsets. But in fact, they are defined by an
object-collection, which can be simply modified by the GUI. For more
info, see Mastering layouts.
The custom views allow for good control over which member values can
be manipulated and which methods can be called directly from the Nest,
and thus the Nest is quite an efficient specialised editor.
Resizing
The double-diagonal-arrow resizer button opens a size-control dialog
for resizing all widgets of the current Eye (size is based on the size
of fonts; useful for viewing complex object collections on limited
screen estates). Note that a global resizer button on the main message
console controls the whole Gled instance.
The button with two vertical bars (resembling a pause on audio
devices) opens a control widget that you can use to set the
size of table columns for the widgets in the nest.
Link and list collapsors
Each lens in the browser is represented by a labelled button (the name
of the label is the Name member variable of the
lens). Double-clicking on the label will open the full-view window for
the lens, where all the widgets generated for its member values and
methods are shown.
The label is preceded by two collapsors. The right one is list
collapsor: it will toggle the display of all list members of the lens
(you can think of list-members as folder contents of standard
file-system tree browsers). The left one is link collapsor: It will
toggle the display of all non-null links. Note that links precede
lists if both are open, and each link is preceded with the link name.
This permits fast browsing of lens aggregations using both link and
list aggregations methods. But as lens aggregates are not necessarily
tree structures the resulting graphs can be circular and it is for
that reason, lens aggregations are not represented as tree
widget. (Note also that ZNode lenses do form a tree structure
with their list contents, and their parents can be accessed through
the Parent link.)
Link display
By default, the link display (on the right) lists all links of the
lens with link names for labels. Each label is preceded by two
collapsors - the first collapsor toggles the display of this link's
contents on the left part of the lens browser, while the second one
toggles also the display of list contents for links to lists (one
level deeper).
Both link collapsors are dark-red when the link is null. The right
callapsor is red when the link does not point to a list.
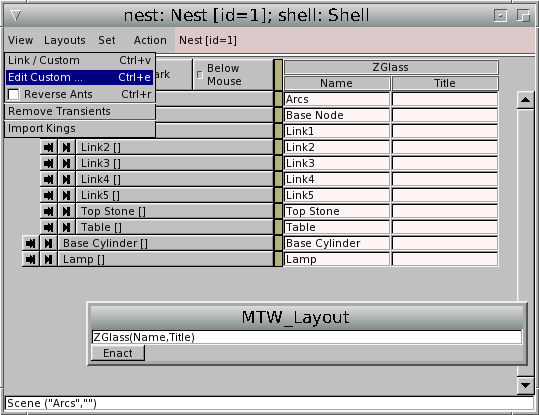
Editing and setting custom lens views
Custom lens view display can be edited with View->Edit Custom
menu action. Syntax for custom view for a class is <class_name>(member_name[{width}][,member1_name[{width}]]). You can
specify multiple classes, using a colon to separate them. Example for
displaying the name for all lenses and radius and LOD of all Spheres:
ZGlass(Name[10]):Sphere(Radius,LOD[4])
Do not forget that Custom has to be enabled for this to have any
effect. You should get this result:
Note that the custom view widgets will work just as well as the
corresponding widgets of the full view windows. This is good for
quick editing of lenses.
A number of predefined custom views can be selected in the menu Layouts.
ZNode custom view
ZNode custom view, available as one of the predefined views, is a
slightly special case. It would be specified as follows:
ZNode(Pos,Rot)
The difficult part is that the Pos gled-widget is composed of three
number-input fltk-widgets for x, y and z offsets of the
ZNode, and the Rot widget is in the same way composed of a,
b and c rotation angels. This can be misleading since both
widgets display their internal labels and Pos and Rot never
appear as labels in the lens' full-view window.
On the other hand, these widgets are prefect for rapid scene editing.
Mastering layouts
Section missing. XXX
Using the lens and link labels
Double-clicking on a lens label will open the full-view window for
that lens. Double clicking on a link label will dereference the link
and open the full view window for the lens the link is pointing to.
Right clicking on the label will open a context menu (the locator
menu). The first level offers some utility functionality (setting the
lens to source and sink, setting "Beta" and "Gamma" links on current
nest and exporting it to a variable accessible from CINT, where
a dialog will prompt you for a variable name to export the lens
to). The Method sub-menu contains a menu per class from the glass
inheritance tree of the lens, listing all methods from each class.
Object collection editing with Nest
Target, Source, Sink
Gled methods can be called using the MIR (method invocation
request) mechanism. A MIR uses a specific calling environment, called
a context. All GUI actions are realized as MIR calls from the Eye,
and method arguments are passed as elements of the MIR context. (For
more information about MIR context and routing see
Propagation of Light in gledparadigms.)
MIR context elements are caller (when using the GUI, this is always
the Eye), recipient (the Saturn on which the method has to be
authenticated for beamed MIRs), alpha (always used for the lens for
which the MIR is sent) and two "positional" context elements, beta
and gamma (the "arguments"). While general MIR calls can be built
in the GUI using the "Beta" and "Gamma" links of the current shell's
ShellInfo, the standard GUI actions will build MIR calls automatically
for the user.
The Nest with its interface for lens graph manipulation uses three
different concepts for stating the purpose of a GUI action: target,
source and sink.
Target points to the lens for which the MIR is sent (the target lens
therefore becomes the alpha of the MIR context). For GUI actions, this
is the lens that gets modified.
Source is the lens argument used for those GUI actions that set a
link (Set Link) or add to a list, (ie. Push, Unshift and
Insert). For any of these actions, source must point to something
with lens contents.
Sink is used with the Yank command which takes target and adds
it at the end of the list sink is pointing to.
Setting target, source and sink with locators
Gled GUI provides several ways to set target, source and sink: two
special selections or locators can be used, called point and
mark, and for the target, the bellow mouse "virtual locator" is
also available. It is important to distinguish target, source, and
sink from locators. The user can control which locator is active for
which function with the target selection widget on each Nest (since
Target is nest-specific) and similar widgets for source and sink on
the Shell.
Important: Locators (point and mark) are indicated with color
feedback on labels, while target, source and sink are indicated with
color feedback on collapsors. The colors correspond with the colors on
the control widgets.
The Bellow Mouse setting can only be used for target. For source,
there is a special option for creating new lenses: Creator (see
Creating lenses). Sink also provides a special option: /dev/null
- in this case, removal commands do not move the lenses, but delete
them instead. (This is the default.)
The point can be set on lenses with normal mouse click on the lens
name. Both locators can be moved using the keyboard, point with
cursor_up and cursor_down, mark with S-cursor_up and
S-cursor_down. Point can be set on links (on the right when link
display is selected) with a mouse click, and mark can be set on links
with a mouse click-and-right drag (where you should drag inside the
widget. The label color changes for feedback: selected lens or link
gets orange for point and blue for mark.
The current setting of target and source is shown on collapsors: green
for source and pink for target. Notice how link collapsors are used
when links are selected while graph-node collapsors are used
otherwise.
Target is nest-specific, meaning that each nest can have its own
target and its own setting for target-locator relationship. Source and
sink are global, but both can be controlled also from the Set menu
on nest window.
The Set menu provides a number of shortcuts for setting Source,
Mark and Sink: Set->Point as Source (F1), Set->Point as
Sink (F2), Set->Mark as Source (Shift-F1) and Set->Mark as
Sink (Shift-F2). The Set menu on nest window allows also swapping
of point and mark with Set->Exchange point and mark [X]. Source
and sink can be exchanged with Set->Exchange source and sink [Shift-X].
Setting links
Links use source and target, where target has to be set to a link-name
label of a lens (on the right side of the object aggregation browser;
not on the decollapsed link under the lens on the left), and source
has to be set to the lens that the link will point to.
Use Action->Set link [s] to set links and Action->Clear
link [c] to clear links.
When using Creator for source, new lenses will be instantiated and
set as link.
A link can also be set with drag and drop: click on the lens label
on the left and carry it to the link label on the right; when the
mouse pointer changes to indicate that the widget is suitable for
dropping, release the mouse button and the link is set.
When links are cleared, lenses that were referenced by the link will
be put into the sink unless the sink is /dev/null. Lenses that are
not otherwise referenced will be put into the orphanage list of their
Queen (unless a sink was defined and they were put there instead) or
deleted, depending on the settings of the Queen (more on
Queens:Kings and Queens in gledparadigms).
Note that the source lens has to correspond to the class of link
(Gled will attempt a dynamic cast to that class and report an error
if it fails.) The most common case of this is a link to a list which
will refuse to accept lenses that are not ZList class or its
descendant.
A link can be set also with the locator menu's method sub-menu
(right-click context menu on the label) using appropriate
SetLinkName method with the lens to be referenced selected by
the "Beta" link of the current nest (See Building MIRs with GUI).
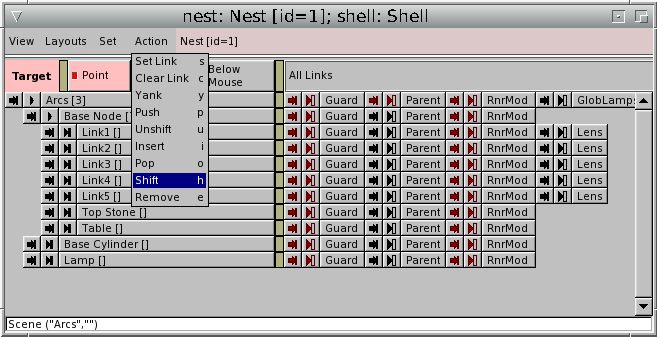
Manipulating lists
Lists can be manipulated with list manipulation commands from
Action menu. Set the list as target and the lens to be added to the
list as source. Set source to Creator for adding new lenses to the
list.
Use Action->Push [p] to append to the list and Action->Unshift [u] to add at the top of the list.
To remove from lists, use Action->Pop [o] to remove from the
end of the list and Action->Shift [h] to remove from the tail.
To insert in the middle of the list set the lens before which you want
the new list member to be inserted as target and use Action->Insert [i]. To remove from the middle of the list, set the
lens to be removed as source and use Action->Remove [e].
Mnemonic help: Note that adding commands use the first letter of the
shortcut, and removing commands use the second letter.
A link to list can be selected instead of the list and the GUI will
dereference the link and use list commands on the target list itself,
if possible.
A list can also be manipulated with drag and drop: click on the
lens label on the left and carry it to the list label on the left or
to the link-to list label on the right; when the mouse pointer changes
to indicate that the widget is suitable for dropping, release the
mouse button. The action performed is always Push (append to the
end of the list).
A list can be also manipulated with the locator menu's method sub-menu
(right-click context menu on the label) of the list, using appropriate
methods from the ZList class or one of its descendants. Set lenses
to be used with "Beta" and "Gamma" link of the current nest (See
Building MIRs with GUI). This method is far more involved than the
standard GUI bindings.
Creating lenses
Lenses are created with insertion commands (Action->Push, Action->Unshift, Action->Insert) and link setting commands
(Action->Set Link) simply by setting source to Creator. This
ensures that the object-graph node for the new lens is set
immediately.
To select what lens should be created, the libset should be selected
with the Lid selection menu and then any glass in that libset can
be selected with the Cid selection menu. (Not that a libset may
have to be loaded first using the Load Libset widget on the Gled
Message Console window to become available.)
Using sink
Sink is the target for yank commands.
Currently sink always pushes at the end of the list and throws an
error if it is not set to a list.
If a list or a link to list is used as sink, removed and yanked lenses
(and lenses that were cleared from links) will be pushed at the end of
the sink list.
Building MIRs with GUI
While the GUI has special shortcut command for the most often used
methods of ZGlass and ZList (and their descendants' implementations),
any context method can be called using the locator menu's method
sub-menu (right-click context menu on the label).
The method submenu lists all classes in the class hierarchy of the
current lens that define any context methods. Each class is a sub-menu,
listing all the context methods in that class.
(Note that ZGlass is missing, for example, since it defines no
methods, and non-context methods, such as Sphere::SetRadius, are
not displayed since they cannot be invoked via a MIR context; you must
build MIRs for such methods by manipulating relevant widgets in the
full view of the lens.)
Each context method is followed by two numbers in parenthesis. The
first number indicates how many context arguments are expected (Alpha,
which is always the current lens, is ignored, so 0 means just
Alpha, 1 means Alpha and Beta and 2 means Alpha, Beta and
Gamma). For beta and gamma arguments, beta and gamma links of the
current nest are used. Use link manipulation methods or Set as Beta
and Set as Gamma of the locator menu to set Beta and Gamma.
The second number is the number of additional arguments. When
additional arguments are required, a dialog will spawn to select them.
Some context methods require additional streamed data, provided as a
post-MIR. Such MIRs currently cannot be build with the GUI.
Using multiple nests
Multiple nests allow you different views of the object
aggregation. Nests are useful also as scratch-pads. Since each nest
has its own locators, they are useful for working with different
locator contexts.
A new nest can be spawned by the New->Nest action on any nest
window (of swallowed nest in the Shell).
The new nest will be empty: it will show only one member, its own
NestInfo. You have to populate the new nest by adding members to
the NestInfo.
Widgets are auto-generated from Project7 commands in C++ comments
next to class member variable and class method declarations, where
perl methods for widget creation are specified directly.
Note that standard FLTK keyboard navigation is available. See
documentation for Value for notes on special mouse bindings.
- Textor
Uses Fl_Input. Read and write widget for text etc. Standard FLTK
bindings apply, including selections and pasting. Enter or
widget-leave will update the value.
- Text_Out
Uses Fl_Output. Read-only widget for text. (But Set method may be
available.)
- Value
Uses Fl_Valuator. Read and write widget for numerical values. Range
and step for the value can be set (limiting the value to an int, for
example). Standard FLTK bindings apply, including selections and
pasting. Enter or widget-leave will update the value.
Mouse drags can be used to manipulate the value. Left-mouse dragging
will modify the value by the defined step (for precision editing),
while middle-drag uses a 10-multiplier and right-drag uses a
100-multiplier. The value is updated at each mouse-drag manipulation
immediately.
- ValOut
Uses Fl_Value_Output. Read-only widget for numerical values (see
Value for details). (But Set method may be available.)
- Bool
Uses Fl_Light_Button. Widget used to represent and toggle boolean
member values.
- BoolOut
Uses Fl_Light_Button. Readonly widget used to represent boolean
member values. (But a Set method may be available nevertheless.)
- PhonyEnum
Uses Fl_PhonyEnum (a custom Gled FLTK widget). Fl_PhonyEnum behaves
as a drop-down selector menu for C++ pseudo-enumerations, so that
logical names can be used instead of cryptic index values for choices.
- MButt
Uses Fl_Button to produce a standard button. Intendet to start lens
methods that do not require any context-arguments.
- ColorButt
Uses Fl_ColorButt. Displays the selected color and starts a
color-selector transient dialog on click.
- Filor
Uses Fl_File_Name (a custom Gled FLTK widget). File name can be
edited as text. Use right click to open a FLTK file selector.
Pupils
Pupil navigation
The pupil is an interactive GL rendering window with a number of
navigation bindings:
-
Mouse_Left moves forward/backward, left/right
-
Ctrl-Mouse_Left moves up/down, left/right
-
Mouse_Middle rotates up/down, left/right
-
Ctrl-Mouse_Middle rotates airplane-style on front-back axis and
left-right axis
-
Keypad-Home resets camera to origin.
-
Mouse-scrollwheel changes the FOV (field-of-view), turning the
viewport in a fish-eye lens or a telescope.
Right-click on the mouse will display a list of lenses under the
pointer (using GL picking; the size of the picking are under the
pointer can be controlled with the PickW and PickH member-values
view the full view of the pupil and BuffSize is the buffer size for
picking, limiting picking depth). For each lens, its render stack is
displayed as a sub-menu.
The Open view ... is often very practical since it opens a full
view on the current object of the rendering stack menu. It allows
precise selection of an object form the rendering stack, where a
double click would open the topmost object. This makes it possible to
access an object that is inside another one.
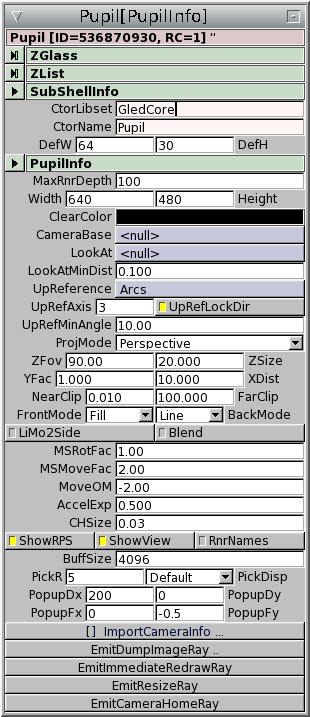
Manipulating Pupils with PupilInfo
Each Pupil is controlled by its PupilInfo, a lens that can be used to
controll and customize the pupil. To facilitate the process, you can
open the PupilInfo by pressing F1 in the Pupil window.
A new Pupil can be spawned from any Nest using New->Pupil menu
command. This will create a lens (gled-object) called PupilInfo and
open a GL rendering window. (While you can close the pupil's GL
rendering window, there is currently no way to open it again, so
please avoid that.)
The Pupil and GL rendering is controlled with the setting of
PupilInfo's member variables. All PupilInfos of a given Nest are
members of a single list (usually called PupulInfos), linked to by
the Pupils link from the Nest itself. To access the Pupils, you
should simply de-collapse the linked list of the Nest. (The PupilInfo
should always be the first member of its lens graph).
PupilInfo's are lists: the Pupil creates the render-graphs by
descending the contents of the PupilInfo as list. So, to render a
scene, simply add it to the PupilInfo (via Push or Unshift, or with
drag-and-drop).
(Note that you can't add a single item twice to have it rendered twice
since the renderings will overlap: use a ZNodeLink> object and set it
to link to the object you want to figure twice in the rendering
scheme, so that you can use it's ZNode transformation to displace the
rendering location.)
The next important feauture of the PupilInfo is the camera control:
the viewpoint can be free (use the bindings to move it freely) or
attached to an object as a camera. To attach the viewing point, set
the PupilInfo's CameraBase link to the object: navigation will now
work as offset to the object.
Use LookAt to set the focus point of the camera/viewport.
You can also set the up-vector for the camera by setting the
UpReference link to a lens. You can choose one of the axes by
setting the UpRefAxis member value: it is an index into (x,
y, z).
There is a number of GL rendering settings that can be set in the PupilInfo:
MaxDepthSets the maximum depth for the GL context.
ClearColorSets the "background" or "clear" color for the rendering window.
FOVSets the Field of View in degrees. The default is 90. Use smaller
values for zoom and larger values for large-angle camera effect.
NearClip / FarClipSets the clipping planes for GL rendering: no vertices closer of
further than this plane will be rendered.
FrontMode / BackModeThese PhonyEnum enumerators are used to set the rendering modes for
front and back-sides of the polygons. Fill, Line and Point
are available. Note that pushing the camera inside a full object will
allow you to see the back-sides of the polygons, rendered in line-mode
(wireframe) by default.
LiMo2Side Toggles the use of 2-sided GL light model: this should be used
whenever the back-sides of polygons should be rendered in fill-mode
and shaded correctly.
BlendToggles the blend function: no alpha values (transparency) are used if
this is off. Note that transparent object have to be rendered in
correct order in GL, and Gled does not reorder objects in the
rendering tree.
PupilInfo's Pupil GUI settings:
CHSizeCrosshair size (in percent). Use 0 to turn off the crosshair.
PickW and PickHWidth and height of the picking rectangle in pixels. The picking
rectangle is used when objects are selected for right-click menu.
MSRotFac and MSMoveFacControls for rotation and motion sensitivity for mouse navigation.
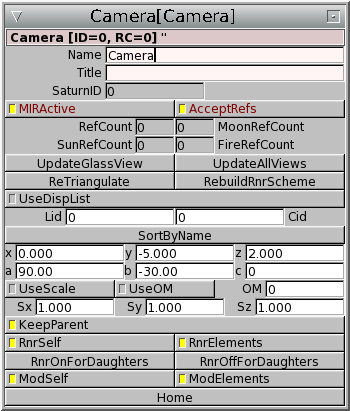
Using the Camera
The camera defines the point of view for the Pupil. It is a special
object for internal use, since it is not really part of the render
tree and is not even enlightened - it can not be part of the
network protocol.
In general, you don't need to access the Camera directly, since you
can translate and rotate it using mousebindings in the Pupil window
and you can use its Home method with the Home keybinding. But it
is a useful programming and GUI interface nevertheless.
At this time, the MetaGUI API is not yet stable, but the facility is
functional. Users are encouraged to explore the functionality, but
your best source of documentation at this moment is the source and the
Geom1/metagui_test.C example in the demos collection.